|

 | | | | | | | | | | | | |
| | | |
| |

|
| OS X & Cocoa Writings by Andrew C. Stone ©1995-2003 Andrew C. Stone |

|
|
|
|
Spaced Out
Adding Paragraph Spacing to the Cocoa Text System
©2002 Andrew C. Sone. All Rights Reserved
One of my favorite Cocoa demos is to make a full featured word processor application in 5 minutes - complete with rulers, tabs, embedded graphics, line spacing, kerning, ligatures, baseline, colors, multi-font, automatic spell checking and more - (see http://www.stone.com/The_Cocoa_Files/Arise_Aqua_.html). Cocoa's powerful text system is a collection of classes that can meet almost any text need, and I highly recommend reading the documentation for these classes:,NSText and NSTextView (the display classes), NSTextStorage and NSAttributedString (how rich strings store all the attributes of unicode text), NSLayoutManager (manages an NSTextStorage and set of NSTextContainers which display in an NSTextView) and playing with the sample Text layout application available in the Developer distribution in /Developer/Examples/AppKit/TextSizingExample.
These full featured classes are getting more powerful with each major system release. In Mac OS X 10.2, a feature which was previously defined in the API was implemented in NSParagraphStyle:
paragraphSpacing
- (float)paragraphSpacing
Returns the space added at the end of the paragraph to separate it from the following paragraph. This value is always nonnegative.
See Also: - lineSpacing - setParagraphSpacing: (NSMutableParagraphStyle)
Paragraph spacing is the additional distance between paragraphs (that is, whenever a <RETURN> appears in the text). This amount is in points (72 per inch) and by default is 0. It's added to any additional line spacing that applies to that paragraph style.
But, although the implementation is there, the interface is not. The ruler, which comes for free with NXTextView, and which contains controls for alignment, line spacing, and tabs, currently lacks any control for setting the paragraph spacing. This article will show you how to add a custom control to the standard text system ruler.
|
| | |

|
|
The standard text ruler in Mac OS X 10.2 doesn't have a paragraph spacing control. |
|
Just using simple subclasses of NSTextView and NSLayoutManager, our page layout and web authoring application Create® can flow text through any size containers, place rich text along any path, apply neon and custom pattern effects to any text, and place text outside or inside of any path. Once Jaguar shipped, we could easily add paragraph spacing to our text - if we could figure out a way to add a new control to the ruler that automatically attaches itself to any NSTextView in an NSScrollView.
Like everything with Cocoa - if it's hard it's wrong. So finding an easy solution with modular application is the always the goal of any Cocoa programming challenge.
Our design imperatives include:
- make it simple
- make it small so it doesn't get in the way
- make it a modular nib file
The solution has 3 parts - a user interface built in InterfaceBuilder, the create/update code in an NSLayoutManager subclass, and code in an NSTextView subclass which actually sets the spacing and maintains the undo stack.
So, I chose to make the narrowest UI possible - using the ¶ symbol for paragraph and an NSStepper:
|
| |

|
| | |
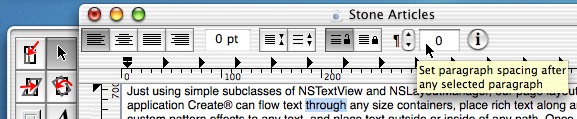
Create® adds a paragraph spacer next to the line spacing tools - ¶. |
| |
|
The first problem is how do we get at the ruler to install the new device? It's owned by NSLayoutManager, which provides a method that returns this ruler view - so that seems like the most appropriate place to instantiate and update our own user interface addition which can set the paragraph spacing:
- (NSView *)rulerAccessoryViewForTextView:(NSTextView *)aTextView paragraphStyle:(NSParagraphStyle *)paraStyle ruler:(NSRulerView *)aRulerView enabled:(BOOL)flag
Returns the accessory NSView for aRulerView. This accessory contains tab wells, text alignment buttons, and so on. paraStyle is used to set the state of the controls in the accessory NSView; it must not be nil. If flag is YES the accessory view is enabled and accepts mouse and keyboard events; if NO it's disabled.
This method is invoked automatically by the NSTextView object using the layout manager. You should rarely need to invoke it, but you can override it to customize ruler support.
Let's Just Face it
We'll use InterfaceBuilder to create the interface and even the stub files for our new class, ParagraphSpacer:
1. Launch Interface Builder
2. File -> New..., Cocoa, "Empty", Click "New"
3. Save this as "ParagraphSpacer.nib" in your project directory - also add it to your project when asked.
4. Double-click the "File's Owner" icon in the folio window - NSObject will be selected in the Classes tab
5. Control-Click NSObject and select "Create Subclass" - name it "ParagraphSpacer"
6. Add two outlets: stepper and containerView by Control-Clicking ParagraphSpacer and choose "Add Outlet to ParagraphSpacer".
7. Control-click ParagraphSpacer and choose "Create Files for Paragraph Spacer" - add these to your project
8. Choose "Instances" tab, select "File's Owner", Info-> Custom Class, select "ParagraphSpacer"
9. From the Tab icon on the Palette, drag a "Custom View" into the folio window
10. Set the view's size with , Info -> Size, 26 wide by 28 tall
11. Drag in "System Font Text", select all, delete, type ¶, Info -> Size 10 wide by 17 tall, locate on left
12. Drag in an NSStepper from Slider Icon tab on Palette, adjust location as needed
13. Connect the File's owner to the two instance variables - the stepper, and the view which holds the stepper and the static ¶ text.
14. Save ParagraphSpacer.nib
ParagraphSpacer
A very simple class which just returns its two instance variables.We need these to install the view into the Ruler view hierarchy and set the value of the stepper during updates:
/* ParagraphSpacer */
#import <Cocoa/Cocoa.h>
@interface ParagraphSpacer : NSObject
{
IBOutlet id containerView;
IBOutlet NSStepper *stepper;
}
- (NSStepper *)stepper;
- (NSView *)containerView;
@end
#import "ParagraphSpacer.h"
@implementation ParagraphSpacer
- (id) init {
self = [super init];
if (![NSBundle loadNibNamed:@"ParagraphSpacer.nib" owner:self])
NSLog(@"couldn't load ParagraphSpacer\n");
return self;
}
- (NSStepper *)stepper; {
return stepper;
}
- (NSView *)containerView; {
return containerView;
}
@end
SDLayoutManager
We just need to add one method to our NSLayoutManager subclass. Note that we call [super rulerAccessoryViewForTextView: ... ] to get the standard ruler provided for us, then we check to see if we have already initialized the paragraph spacer, and if not, proceed to create it, find it's proper position in the ruler and install it. We'll travel down the view hierarchy, looking at the subviews of each view. When we find a view with several subviews, then we know we're in the right place. When we find the view that starts far to the left, ie, not the tab well, but the NSBox which surrounds the alignment and line spacing controls, we'll place our control right next to it. We just have to hope that the ruler doesn't change drastically - if it does, it will probably have more controls in it, and our layout may be wrong.
Each time this method gets called, we'll set the target of the stepper to be the current text view with an action of changeParagraphSpacing:, and update the value of the stepper so that it sends the target the right value when incrementing or decrementing.
@interface SDLayoutManager : NSLayoutManager
{
@private
NSStepper *_paragraphStepper;
}
@implementation SDLayoutManager
- (NSView *)rulerAccessoryViewForTextView:(NSTextView *)view paragraphStyle:(NSParagraphStyle *)style ruler:(NSRulerView *)ruler enabled:(BOOL)isEnabled {
NSView *accessory = [super rulerAccessoryViewForTextView:view paragraphStyle:style ruler:ruler enabled:isEnabled];
if (!_paragraphStepper) {
ParagraphSpacer *spacer = [[ParagraphSpacer allocWithZone:[self zone]] init];
NSView *viewToAdd = [spacer containerView];
NSArray *subviews = [accessory subviews];
NSView *viewToAddTo = accessory;
unsigned int i, count = [subviews count];
NSRect viewRect = [viewToAdd bounds];
if (count == 1) {
viewToAddTo = [subviews objectAtIndex:0];
subviews = [[subviews objectAtIndex:0] subviews];
count = [subviews count];
}
_paragraphStepper = [spacer stepper];
for (i = 0; i < count; i++) {
NSView *v = [subviews objectAtIndex:i];
NSRect r = [v frame];
if (r.origin.x < 10.0) { // it's the box containing the left controls)
viewRect.origin.x = r.origin.x + r.size.width;
viewRect.origin.y = 0.0;
[viewToAdd setFrame:viewRect];
[viewToAddTo addSubview:viewToAdd];
}
}
}
[_paragraphStepper setDoubleValue:style? [style paragraphSpacing] : 0.0];
[_paragraphStepper setTarget:view];
[_paragraphStepper setAction:@selector(changeParagraphSpacing:)];
return accessory;
}
@end
SDTextView
If you don't want to subclass NSTextView, you could instead add the changeParagraphSpacing: method to a category of NSTextView. This is not the case with the NSLayoutManager subclass, because we need to call super's implementation of rulerAccessoryViewForTextView:paragraphStyle:ruler:enabled:.
The main reason we place this code in NSTextView or a subclass is so we get the free automatic undo associated with Text. To do that, we alert the text system that there will be changes in a certain range with shouldChangeTextInRange: replacementString: with a replacement string of "nil" , which means other attributes are changing, but not any characters. Then, we walk over text paragraph style by paragraph style, setting the paragraph spacing to the value determined by the stepper (up or down a point from the first style in the selection). Note that if there are no paragraph attributes, one is added.
Finally, we alert the text that we are done changing it with didChangeText, and we add a custom action name so the menu will say "Undo Paragraph Spacing" and "Redo Paragraph Spacing".
@interface SDTextView: NSTextView
{}
@end
@implementation SDTextView
- (void)changeParagraphSpacing:(id)sender {
double value = [sender doubleValue];
NSRange range = [self rangeForUserParagraphAttributeChange];
if (range.length > 0) {
NSRange remainingRange = range;
NSTextStorage *storage = [self textStorage];
[self shouldChangeTextInRange:range replacementString:nil];
while (remainingRange.length > 0) {
NSRange effectiveRange;
NSParagraphStyle *para = [storage attribute:NSParagraphStyleAttributeName atIndex:remainingRange.location longestEffectiveRange:&effectiveRange inRange:remainingRange];
if (para == nil) {
para = [[[NSMutableParagraphStyle alloc] init] autorelease];
[para setParagraphStyle:[NSParagraphStyle defaultParagraphStyle]];
} else para = [[para mutableCopyWithZone:[self zone]]autorelease];
[para setParagraphSpacing:value];
[storage addAttribute:NSParagraphStyleAttributeName value:para range:remainingRange];
if (NSMaxRange(effectiveRange) < NSMaxRange(remainingRange)) {
remainingRange.length = NSMaxRange(remainingRange) - NSMaxRange(effectiveRange);
remainingRange.location = NSMaxRange(effectiveRange);
} else {
break;
}
}
[self didChangeText];
[[self undoManager] setActionName:NSLocalizedStringFromTable(@"Paragraph Spacing",@"Muktinath",@"change of space between paragraphs")];
}
}
@end
All Together Now
Your final task is just to be sure you create your text system with the special SDLayoutManager. If you have a shared text editor, it might look something like this:
static NSTextView *newEditor(TextArea *self) {
SDTextView *tv;
NSTextContainer *tc;
// This method returns an NSTextView whose SDLayoutManager has a refcount of 1. It is the caller's responsibility to release the SDLayoutManager. This function is only for the use of the following method.
SDLayoutManager *lm = [[SDLayoutManager allocWithZone:NULL] init];
tv = [[SDTextView allocWithZone:NULL] initWithFrame:NSMakeRect(0.0, 0.0, 100.0, 100.0) textContainer:nil];
tc = [[NSTextContainer allocWithZone:NULL] initWithContainerSize:NSMakeSize(1.0e6, 1.0e6)];
[lm addTextContainer:tc];
[tc release];
[tc setTextView:tv];
[tv release];
return tv;
} |
|
|
|
The new text ruler with paragraph spacing stepper installed |
|
Conclusion
The Cocoa text system just keeps getting better. And sometimes there are features that are still hidden from the user interface, such as paragraph spacing in Jaguar 10.2. With a little Cocoa magic, it's easy to install your own custom controls and add more functionality to the standard text object.
Andrew Stone, CEO of Stone Design, www.stone.com, has been the principal architect of several solar houses and over a dozen Cocoa applications shipping for Mac OS X.
|
|