|

 | | | | | | | | | | | | | | | | | | | | |
| | | |
| |

|
| OS X & Cocoa Writings by Andrew C. Stone ©1995-2003 Andrew C. Stone |

|
|
|
Help On The Way!
A guide for the perplexed on adding Apple Help to your OS X application
©2001 Andrew C. Stone All Rights Reserved
A really well-designed application shouldn’t require a help system, but no application is truly ready to ship unless it has comprehensive, online, at the user’s fingertips, Help. Furthermore, a cardinal rule about Help is “the programmer should not write the Help.” Ideally, the Help authors are normal human beings who can write simple concepts in plain sentences, not coders who think recursively in an obfuscated manner! Step One: get someone else to write the Help!
We have a saying here at Stone Design regarding help: “if it’s hard to explain, then it’s wrong.” The process of creating Help can provide excellent feedback on the user interface and core “mental model” of your software’s architecture. Too often, Help is left for last, and then it’s too late to incorporate solutions to the problems uncovered by having to explain how to do a task.
This article will explain how to add help to your OS X application, both comprehensive, searchable Help through the use of the Apple-provided companion application “Help Viewer,” and the simple User Interface “Tool Tip” help that pops up a small window when you leave your mouse over a control for a few seconds. A third, intermediate form of Help is context sensitive menus and associating longer rich text files with interface components, but we’ll leave that as an exercise for the reader.
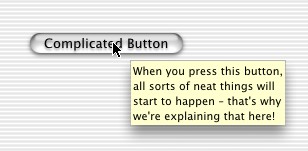
Tool Tip: Don’t forget your umbrella when it rains
The simplest form of Help is Tool Tips—and since users are often confounded by interface controls, you should always provide these. Interface Builder, a powerful user interface building application which now supports both Carbon and Cocoa development environments, makes adding Tool Tips easy.
|
|
| | | | | |
|
|
| |
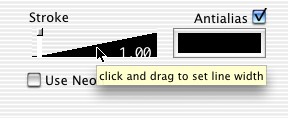
1. Open your nib files in Interface Builder
2. Select a control
3. Bring up the Info panel: Tools -> Show Info
4. Select “Help” from the popup button to load the Help pane
5. Enter your Help tip
6. IMPORTANT: Type <RETURN> to make sure the Help tip sticks!
|
| |
|
|
|
Sometimes you may have to have a larger amount of text to adequately explain a certain control—here’s a tip for you: to make multiple line help tips, insert an <OPTION-RETURN> between lines. In fact, this same technique is useful in any application where you have a standard textfield and you want to add a <RETURN> or a <TAB> to the contents of the field. Normally, textfields are set to “end editing” when the user types a <RETURN> or a <TAB>. The workaround is to hold down the Option key while you are typing the <RETURN> or <TAB>.
|
| | | |
|
|
If you read the documentation on setToolTip:, you can see that it’s a method implemented by NSView and all of its subclasses. This is fine until you go to provide Help for cells in an NSMatrix—Interface Builder only allows you to set one tip per view. Yet NSMatrix declares a method - (void)setToolTip:(NSString *)toolTipString forCell:(NSCell *)cell, so obviously it’s possible to add a tool tip to each of the cells. Hopefully, the hardworking IB team will add an easy way to add tips to cells, but meanwhile, you can do this programmatically. For example, if you have a dynamically loaded tool palette matrix, where each cell represents a Class to instantiate when its selected, you could do something like this:
unsigned i,c;
unsigned rows = [toolMatrix numberOfRows];
unsigned cols = [toolMatrix numberOfColumns];
for (r = 0; r < rows; r++) {
for (c = 0; c < cols; c++) {
NSButtonCell *cell = [toolMatrix cellAtRow:r column:c];
Class theClass = [cell representedObject];
if (theClass) [toolMatrix setToolTip:NSStringFromClass(theClass) forCell:cell];
}
}
If your class names are not meant for human consumption, like SKTImage, then each of your tool classes could return a method, + (NSString*)humanReadableName, and you’d replace NSStringFromClass(theClass) with [theClass humanReadableName] above.
Comprehensive Help and Apple Help Viewer
Whether your application is a full blown desktop publishing package or a simple utility, you should always include searchable help. And the folks at Apple have tried to make that easy by providing Help Viewer—a stand alone application that gets called to load your “Help Book.” Making a Help Book has a number of steps and a few gotchas, so let’s go over the process step by step. This is meant as an introduction and quick start. Full documentation on the subject is available from Apple |
|
|
|
1. Write your help in HTML
First, you’ll need to create the web pages that represent your help in HTML V3.2 - later features may not be supported in Help Viewer. Of course here at Stone Design, we use Create® because it allows us to create content in a page layout/web authoring system, and then it automatically generates the interconnected web pages. This allows us to add more content later and not worry about the HTML. However you make your pages, make them in a folder named “APPNAME Help”, where APPNAME is the actual name of your application. Something that bit me was that all of our applications used the name “Help” for the Help directory, and this ended up confusing Help Viewer.
2. Indicate the start page
Once you have your HTML in a folder, you need to add the following META TAG to the <HEAD> area of the html page that you wish to be shown first:
<META NAME=”AppleTitle” CONTENT=”MyApp Online Help”>
Tip: you should add Description and Keywords meta tags if you want more info to appear in Help Viewer’s search results.
Gotcha: don’t leave spaces on either side of the “=” or the meta tag won’t parse correctly. I copied/pasted from Apple’s Help info site which includes extra spaces in the meta tag and then wondered why things didn’t work!
3. Add the Help to your Project Builder Project
a. Select the Resources folder in the Groups & Files pane on the left
b. Choose Project->Add Files...
c. Navigate to your Help files and select the root folder
d. A new sheet comes down: select “Create Folder References for any added folders”, click Add
This means the Help is added as an opaque blob - whatever is in that folder gets copied to the app
e. Project -> Show Info
f. From “Localization and Platforms” popup, select “Make Localized”
This will copy your help into your Project’s English.lproj, if that is your development language.
4. Add the Key-Value pairs to alert the system that Help is available
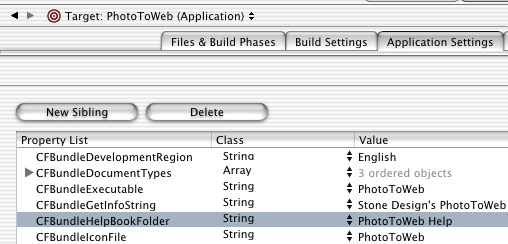
There are two important keys for Help Viewer to work: a localized one (CFBundleHelpBookName) and a global one (CFBundleHelpBookFolder). The global key indicates the name of the Help folder, and the localized key indicates the title of the Help Book as it should appear in Help Viewer. The global key is added to the project by selecting the target, and in the “Applications Settings” tab of theTarget pane, choose “Expert”. Click “New Sibling”, and type CFBundleHelpBookFolder in the field on the left. Leave “String” selected as the type and enter the name of the folder containing Help in the field on the right.
|
|
| | |
|
|
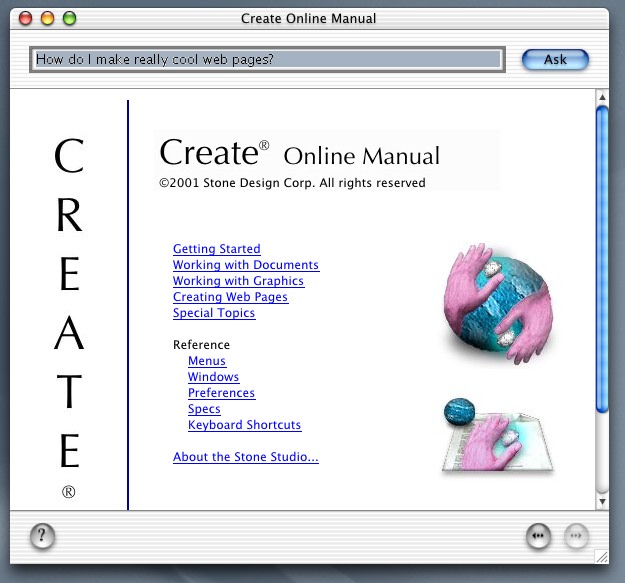
Localized keys (keys meant to be in the language of the end user) are added to a file named InfoPlist.strings. Create this file and add it to your project, localized, if it doesn’t yet exist. This file typically contains strings like the get info string, Add the CFBundleHelpBookName and the title you want to be shown on the right hand side. This name MUST MATCH the CONTENT field of <META NAME=”AppleTitle” CONTENT=”MyApp Online Help”> that you added to the start html page in step 2 above.
{
CFBundleGetInfoString = “Stone Design’s PhotoToWeb®. Copyright © 1990-2001, Stone Design Corp. Visit www.stone.com”;
CFBundleHelpBookName = “PhotoToWeb Online Help”;
}
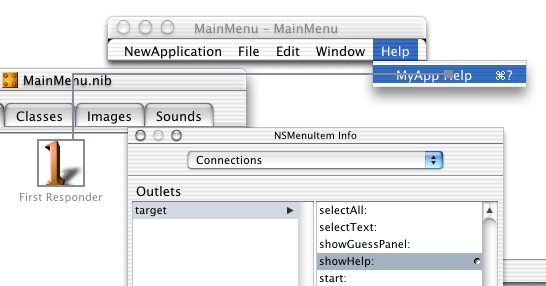
5. Hook up a menu item to First Responder’s method, “showHelp:”
Open your main application nib file in Interface Builder. Double-click the menu icon to bring up your app’s main menu. Check to see that Help -> APPNAME Help is connected to the First Responder icon, and that the action “showHelp:” is selected.
|
|
|
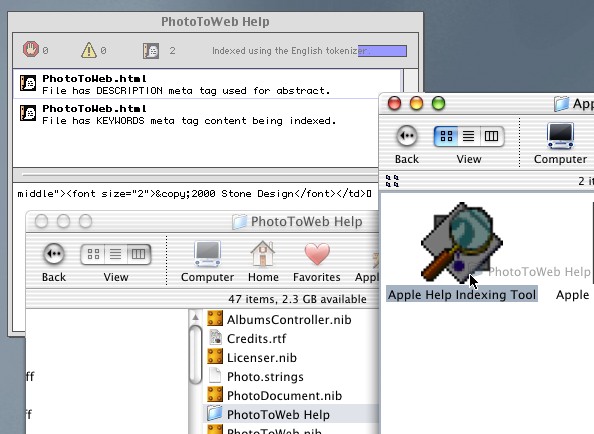
6. Build the idx index file which gives Help Viewer the Sherlock searching capabilities
So far, easy, right? This is the last step, but it has a number of substeps to it! At the time OS X shipped, there was only a Mac OS 9-based Carbon tool to make these indices: ‘Apple Help Indexing Tool’ (on most of the dev CDs, eg:
‘/Volumes/Developer Tools/CarbonLib SDK/CarbonLib_1.2.5_SDK/Carbon Help Viewer/Apple Help Indexing Tool’).
a. Build your application with the Help directory so that Help is in its “final” relative location
(In a Cocoa app, that’s APPNAME.app/Contents/Resources/English.lproj/APPNAME Help)
b. In Finder, select your built application
c. Hold down the Control key so that the context menu pops up
d. Select “Show Package Contents” to allow peering into your application
e. traverse into your application package until you select the HELP folder
f. Set the creator and type of all HTML files to creator: ‘hbwr’ type: ‘TEXT’
[note: step f. is no longer needed by Mac OS X 10.1 and greater]
A gotcha of Mac OS X 10.0 indexer tool is that all of the html needs to have its creator and type set. Apple provides a command line tool to do this: /Developer/Tools/SetFile. For example, a way to set all the html in a folder correctly would be to type in a terminal:
cd <HELP FOLDER>
foreach i ( *html )
This gives you back a prompt:
foreach ->
Type:
foreach -> /Developer/Tools/SetFile -c ‘hbwr’ -t ‘TEXT’ $i
foreach -> end
The foreach command lets you create commands that get executed on each valid file, in this case, all files ending in html in the current directory.
g. Drop the folder onto the icon of Apple Help Indexing Tool to launch Classic and the indexing tool
h. If the file parses correctly, you’ll see 0 warnings and 0 errors, and the APPNAME Help idx file will appear at the top level of your help folder.
|
|
|
|
| | | | |
You must create the index "in situ" so that the links will work |
|
i. Copy the idx file into your Development source directory’s English.lproj/APPNAME Help folder. If you forget this step, then Help Viewer won’t work!
7. Build your application for deployment and test help—Help should “just work.” Help Viewer should launch and display your start page. You should be able to make queries and get back clickable links to the relevant help pages.
If it doesn’t work you should check on the following points of minutiae:
- Did the indexer parse your file correctly? If not, check for unmatched tags.
- Did the Key-Value pairs get added correctly? You can open Info.plist inside the application Contents folder and see if the global key CFBundleHelpBookFolder is there, and that it exactly matches the name of the folder containing your help files (I recommend APPNAME Help). Does the English.lproj/InfoPlist.strings file contain CFBundleHelpBookName key value pair?
- Is the CFBundleHelpBookName value the same as your META TAG for “Apple Title” from step 2 above?
Now, all you have to do is repeat for each language your program supports! When you do localize your application to other languages, besides just translating the .strings and .nib files, remember to have the HTML translated and then build a new index for each language supported.
Conclusion
Developers hope to create intuitive and easy to use interfaces, but users tend to get lost more easily than we expect. In order to avoid tedious tech support calls, it is ideal to provide several levels of Help in your Mac OS X application. Leveraging on Apple’s built in Help Viewer technology, you can provide deep searchable help using standard HTML and even include quicktime videos, sounds, and images.
Andrew Stone, is chief crystal gazer at Stone Design, www.stone.com, and has been coding in Cocoa as an independent software developer for over 14 years.
|
|