|

 | | | | |
| | | |
| |

|
| OS X & Cocoa Writings by Andrew C. Stone ©1995-2003 Andrew C. Stone |

|
|
|
|
| |
| |
Arise Aqua!
A Programmer’s Introduction to Developing for Mac OS X
©2001 Andrew C. Stone All Rights Reserved
The release of Mac OS X Developer Preview 3 in late February has ushered in a brave new world for both traditional Macintosh and veteran Cocoa OpenStep programmers. The new Aqua interface demoed by Steve Jobs at MacWorld San Francisco is now in the hands of the Mac vanguard. This release represents a convergence of the best ideas from the Carbon (Mac OS) and the Cocoa (aka Rhapsody/OpenStep) worlds, and has everything you need to produce first class applications for the forthcoming Mac OS X release late this summer.
Without a doubt, the most immediately striking part of DP3 is the Aqua Interface - a truly liquid and almost candy-like user interface that is a pleasure to behold.
The use of subtle, fuzzy shadows on windows, semi-transparent title bars, animated effects and “gum drop” controls represent a breakthrough in UI design and an entirely new look and feel for Mac OS X. Revolutionary interface concepts such as the “drawer”, pop-up and self-magnifying dock, drop-down sheets and single window mode address the desktop clutter that is the bane of modern operating systems. The drawer is a sub-window which is attached to a parent window and can be pulled out as need arises.
The new Mac OS X Finder sports the Dock, which is a user-defined set of application and document icons along the bottom of the screen. Features include “auto-hide” and a magnification mode to help the fading eyesight of the baby boomer generation. As your cursor passes over the miniaturized windows and application tiles, the icons underneath magnify so you can better see what’s being represented. And true to the Macintosh Way, the Finder has preferences which allow you to adjust and turn off these features if they don’t suit you. |
|
| | |
| | |

|
|
|
As the mouse rolls over the icons in the Dock, they are magnified. |
|
|
|
| | |
| |

|
| Your icons should have multiple resolutions (16 by 16, 32 by 32, 48 by 48 and 128 by 128) to take advantage of Finder’s magnified dock and inspector, otherwise, they’ll look rather jagged. Apple has provided tools to make these .icns resources. Later in the article, you’ll learn how. |
|
|
|
|
Of great importance to the existing Mac community is “Classic.app”. Classic is basically the old Mac OS Finder. When launched, Classic will let you double-click and run all of your old Mac OS applications, without the annoying separate world of the “Blue Box”, also known as MacOS.app. These applications’ windows appear in the same desktop as new Mac OS X applications.
However, one thing becomes perfectly clear when you run an old Mac OS application: it really looks out of place and kind of “cheesy”. There is no window depth or shadows and you can only drag the outline of the window. When placed side by side with a new application, it appears rather pale. If your application is to compete on Mac OS X, it had better take advantage of the Aqua interface and memory management features of the new operating system.
So there are two approaches to building Mac OS X applications and your choice will depend on a number of factors. For traditional Macintosh developers who have large code bases, using the Carbon software development kit is the fastest way to go. With just a little pruning of no longer supported API, you can give your classic Mac apps a face lift and gain much new functionality for very little expended effort. If you are writing a new application, or willing to gut and rewrite an old one (something which really does need to be done every ten years!), then I strongly recommend using Apple’s high level, “Five Story” Application Programmer’s Interface named Cocoa.
The Object Satori
When I first encountered the core ideas at the heart of Cocoa over twelve years ago, and realized the elegance and power at my fingertips - I had a major realization that I call “Object Satori”. This article aspires to be the cyber-equivalent of being given your first “cup of koolaid” and is geared towards Classic Mac programmers, refugees from the Windows World and of course, the Cocoa Choir. The focus of this article is to explain the rationale behind object oriented frameworks and provide you with the motivation and inspiration for going beyond Carbon into the gleaming skyscraper of Cocoa.
I started my programming life as a HyperTalk scripter, and had run into a brick wall trying to learn the Mac toolbox programming XFCN’s. When I heard about the NeXT on the comp.sys.mac USENET newsgroup, I was totally intrigued and given the hope of a much easier development environment.
Six weeks after a four day crash course at “NeXT Camp” in the spring of 1989, I had finished my first Cocoa app. TextArt was a type styling program which used Display PostScript to let you do cool things to type by taking advantage of the built-in functionality of the AppKit, Cocoa’s user interface framework. This app allowed you to do things that were impossible on other platforms, and yet I had to write very little of the code that did all these effects!
Today, I have seven applications <link to www.stone.com> that run on Mac OS X Server and are ready for release on Mac OS X. Cocoa has empowered a single programmer to produce applications that have taken teams of programmers on other platforms. The advantages of Cocoa can be summed up by saying it makes programming easy and fun.
A Rose By Any Other Name
What is Cocoa? A delicious beverage that induces a neuro-chemical rush similar to your first kiss, that is better than Java for your health. What a comforting and evocative name that makes you want to curl up by the fire! Cocoa began life in the late ‘80s as the AppKit when a frustrated Mac programmer had a vision that the “NeXT” Mac should be easier to program than it currently was. Here we had the easiest computer to use on the planet, and it only required that you understand assembly language and A-traps to program it! You might remember that AppKit founder William Parkhurst had written a plugin for MacPaint that allowed you to rotate and flip the selected bits, which was really cool in ‘85!
The AppKit evolved into NeXTStep, which split into the Application and Foundation frameworks of OpenStep, an open object oriented API that was renamed “Rhapsody” when Apple acquired NeXT in 1997. I think the failure of Lotus “Jazz” should have been a sufficient sign that musical monikers are to be avoided. You really want a name that simply tastes good, thus we have Cocoa.
Apple is fortunate to have many of the old NeXT engineers, including one of the four original AppKit programmers, Ali Ozer who leads the AppKit group. Much has been learned about object oriented programming in these intervening years, and new functionality is continually being added. What this means to us programmers living in the trenches is that we have less code to write and maintain, and can focus solely on what makes our programs different.
A Short History of Object Oriented Programming.
Before we delve into the frameworks that make up Cocoa, it’s worth stepping back 35 years to two concepts that underlie OO programming: abstract data types and data hiding. An object is a collection of data and the operations (what we call methods) upon that data. It’s like a black box - we know the inputs and the outputs, but the implementation does not concern us. What this means is that we are free from knowing the intricacies of complex code, and yet we are free to take advantage of it.
This is a radically different programming metaphor than the “imperative” programming of C, Pascal, Fortran and Basic. In an imperative programming language, you are telling data what to do, and a deep understanding of the involved data structures is required. If a data structure changes, your code will break. However in the Object Oriented paradigm, should the implementation of an object change to a more efficient one, our code will continue to work, and in fact, gain all the benefits of the enhanced object. Data is hidden from view, and instead of giving an object detailed instructions to do something, it knows how to do it by itself.
There is a certain cyber machismo in being able to write btrees in Fortran or Lisp interpretors in C, but shouldn’t the goal be to make our lives easier, not harder? What makes it possible to manage the complexity of large software is the boundaries between modules, that is, the Application Programmer’s Interface (API). With regard to intellectual discovery, I believe in cognitive dissidence, but when it comes to programming, I believe in being a model citizen, and sticking strictly to the API. This adherence keeps your code running when there are new system releases, and puts the burden of correct operation onto Apple, where their programmers can maintain and enhance your code! Moreover, when features are added to Cocoa, your application automatically gains the new features, even without recompilation.
Where do I start?
Learning a new programming environment can seem like an imposing task. Luckily, everything you already know will make it easier to learn Cocoa. In fact, most of what you have to do is quit doing things the hard way! For example, you’ll never have to clone another event loop if you don’t want to. Often you’ll find that if a task is difficult, then you are approaching the problem in the wrong manner.
You can program Cocoa in any combination of the big three object oriented languages: C++, Objective C and the highly hyped Java. Objective C is the choice of long-time Cocoa programmers and is the actual language used “under the hood” in the major frameworks of Cocoa. Its dynamic runtime binding allows terse, elegant and reusable code.
Although the total Cocoa API is large, it’s very accessible for two reasons: you can learn it as you use it and the methods you call have a consistent and natural language naming pattern. For example, to allow a text object to accept dragged and dropped graphics, you’d write:
[myTextView setImportGraphics:YES]; // myTextView.setImportGraphics(true);
An even easier way is to create the textView in Interface Builder - Cocoa’s visual user interface design application. Simply click the switch in the NSTextView Inspector that says “Allow Graphics”.
To bring up a save panel and save your text, replete with graphics, you simply write:
// Grab an instance of the global Save Panel:
NSSavePanel *savePanel = [NSSavePanel savePanel];
// save the text in an rtfd file wrapper
[savePanel setTypes:[NSArray arrayWithObject:@”rtfd”]];
// run the save panel modally to get the filename
if ([savePanel runModalForDirectory:nil file:nil
relativeToWindow:[myTextView window]])
// the text object knows how to save itself:
[myTextView writeRTFDToFile:[savePanel filename] atomically:YES];
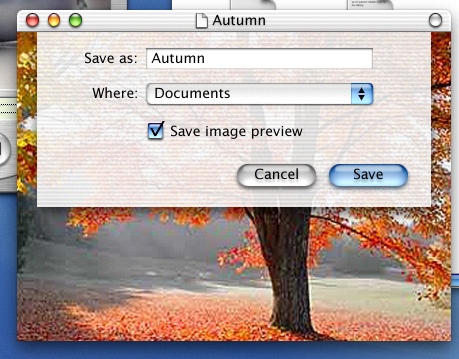
Under the Sheets
A powerful new interface concept in Aqua is the notion of document modal windows or “sheets”. Do you hate modal windows as much as I do? Sometimes, you need them. However, this will freeze up your application until the user deals with the modal panel. Apple has taken a fresh look at modality and came up with this realization: there is no need to stop user interaction except in the window that requires modal attention. A sheet is a drop down window that appears as if it is coming out of the title bar of the document window:
|
|
|
|
|
The rest of your application remains available for user interaction.
In Developer Preview 3, these “sheets” are only available in the Cocoa frameworks, but Carbon support will hopefully be forthcoming. Implementing sheets is quite easy - you simply add the new parameter relativeToWindow:(NSWindow *)aWindow to your old favorite modal invoking methods such as runModal and NSRunAlertPanel family.
Supporting Mac OS X Sever and Mac OS X
Since many developers have wanted to be able to ship applications for both Mac OS X Server and Mac OS X, and it’s tricky to maintain multiple source code trees in synch, here’s a tip for creating a single source tree that compiles under both Mac OS X and Mac OS X Server. First, since we want the future to be uncomplicated, we’ll define a variable only if we’re compiling under Server, OSX_SERVER. In Project Builder’s Build Inspector, you add “-DOSX_SERVER” in the Cflags field. Then in your source code, you can have constructs such as this to take advantage of the new Cocoa features, but still compile on Server:
// run the save panel modally to get the filename
if ([savePanel runModalForDirectory:nil file:nil
#ifndef OSX_SERVER
relativeToWindow:[myTextView window]]
#endif
)
[myTextView writeRTFDToFile:[savePanel filename] atomically:YES];
Since you want your nib files to be tuned to the new Aqua interface and since nibs saved under Aqua cannot be read by earlier releases, you will need to include an extra set of nibs. The NIB architecture includes platform-dependent support based on the suffix of the root name: -macos for OS X and -macintosh for Server. For example, if your main document nib was “Document.nib”, OS X would first try to load the nib named “Document-macos.nib”. Again, since we want the future to be simple, rename your Server nib to “Document-macintosh.nib”, and let the new aqua nib be simply “Document.nib”.
Model View Controller Pattern
If you really want to use the power of Cocoa, you should take advantage of the Document Architecture. ProjectBuilder is the focus point for development with Cocoa - it manages all of your files and resources, lets you edit, build and debug your application, and provides central access to all the other editors, such as InterfaceBuilder for your interface files. In ProjectBuilder, when you create a new project, select “Document Based Application” from the pop-up list. This gives you a lot of functionality for free, and makes creating full featured applications with multiple document windows (and even multiple windows on each document!) extremely easy.
The Document Architecture is covered in detail in /System/Library/Frameworks/AppKit.framework/Resources/English.lproj/Documentation/Reference/ObjC_classic/Classes/NSDocument.html on both Server and Mac OS X. Conceptually, a document holds the data or Model, but does not “show” the data. Displaying the data is the responsibility of the View. Manipulating the data through interface controls and inspectors is the bailiwick of the Controller. By separating out these responsibilities, many benefits are realized:
1. The clear separation of tasks avoids spaghetti code and misplaced code
2. Components are separate and thus more easily reused
3. A document can display its data in several views simultaneously
4. You get a robust architecture which can grow without getting rickety
To look at the source code of an application which is structured along the MVC design pattern, check out /System/Developer/Examples/AppKit/Sketch.
By utilizing the Cocoa API, your application will automatically gain use of new features that are rolled into the provided classes. Sometimes, you might just have to provide a new menu item, so the user can access the new functionality. Case in point is a new feature for NSTextView in Mac OS X DP3: the ability to see misspelled words as you type. Since this can get annoying, it’s good to provide a menu item to allow the user to toggle the feature. This menu item “Check Spelling As You Type” will be connected to the action toggleContinuousCheckSpelling:, NSTextView’s API to turn continuous spell checking on and off.
As of the writing of this article, InterfaceBuilder doesn’t automatically add this feature to the default Edit menu, so you’ll have to do it yourself. To add “Check Spelling As You Type” to your application, follow these steps, most of which are to reorganize the spelling functionality into a sub-menu group:
1. Open your application’s main nib file in Interface Builder
2. Click on the Edit menu to drop it down.
3. Drag a new “Submenu” from the Menu palette onto the Edit menu
4. Rename the “Submenu” to “Spelling”
4. Cut the “Check Spelling” menu item from the Edit Menu, and Paste it onto the Spelling submenu
6. Likewise, cut the “Spelling...” menu item, and paste into the Spelling submenu.
7. Double-click the “FirstResponder” icon in the IB Document window.
8. Click the “Actions” button of First Responder, to drop down the actions.
9. Type <RETURN> to add a new action.
10. type in “toggleContinuousCheckSpelling:” as the action name.
11. Change the title of the “Item” menu item to “Check Spelling As You Type”.
12. Connect this menu item to the First Responder icon, and choose the toggleContinuousCheckSpelling: action.
13. Save, build and voilá
Extensibility
In the Sheet screenshot earlier in the article, you’ll notice that the standard save panel has an additional button, “Resources”. Throughout Cocoa, you’ll find easy ways to add functionality to the existing tool box, and most standard panels have a method “setAccessoryView:(NSView *)aView” to add custom user interface elements and functionality.
We’ve found that it really helps users if they save all of their documents in one standard (and of course user configurable!) location. With the “Resources” button, a single click takes them to the folder from which our design application Create loads its resources. It’s possible to create an Interface Builder “nib” file to hold the single button, but that’s sort of overkill because you are loading a window that you do not need. Instead, let’s look at the code to create and configure the button programmatically.
Subclassing a method is one way to quickly add functionality and still take advantage of the hard work done by the superclass. Since Create uses the Model-View-Controller pattern, in the NSDocument subclass, we simply subclass runModalSavePanel :
// aqua buttons are HUGE, so we set BUTTON_HEIGHT according to platform:
#ifdef OSX_SERVER
#define BUTTON_HEIGHT 24.0
#else
#define BUTTON_HEIGHT 34.0
#endif
// really useful MACRO
#define IS_NULL(x) (x == nil || [x isEqualToString:@””])
- (int)runModalSavePanel:(NSSavePanel *)savePanel
withAccessoryView:(NSView *)accessoryView
{
static BOOL firstTime = YES;
// we’ll add the accessory view on the first time through here:
if (firstTime) {
NSRect aFrame = [accessoryView frame];
// ask our class to create the button for us:
NSButton *button = [[self class] libraryButton:aFrame.size.height inZone:[savePanel zone]];
// make the accessory view larger to hold our new button:
aFrame.size.height += BUTTON_HEIGHT;
[accessoryView setFrame:aFrame];
// now, stick the button into the accessoryView:
[accessoryView addSubview:button];
firstTime = NO;
}
// let the superclass, NSDocument, do the real work:
return [super runModalSavePanel:savePanel withAccessoryView:accessoryView];
}
+ (NSButton *)libraryButton:(float)originY inZone:(NSZone *)zone {
NSButton *button;
// Use a localized version of the Button title for international clients:
NSString *s = NSLocalizedStringFromTable(@”Resources”,@”Muktinath”,”button title for SavePanel/OpenPanel to go immediately to user files”);
// the size of the button is controlled by the local message font
// by passing in “-1.0”, it means “use the system’s default size”
button = [[NSButton allocWithZone:zone ] initWithFrame:NSMakeRect(1.0,originY,[[NSFont messageFontOfSize:-1.0] widthOfString:s] + 30.0 ,BUTTON_HEIGHT)];
// set up the button’s title and behaviour:
[button setTitle:s];
[button setBezelStyle:NSPushButtonBezelStyle];
// set up the button’s target and action:
[button setTarget:self];
[button setAction:@selector(gotoLibraryAction:)];
return button;
}
// here’s the callback method that occurs when the user pushes the button:
// We place this in CreateDocument Class so that we don’t have to worry
// about an instance of CreateDocument being freed:
// This shows how to do simple recursion:
// We traverse down the view hierarchy looking for the NSBrowser
// As long as there’s just one, this code will work!
+ (IBAction)gotoLibraryAction:(id)sender {
NSSavePanel *savePanel = (NSSavePanel *)[sender window];
// begin the recursion of the top level view in the Save Panel:
[self findBrowserInView:[savePanel contentView]];
}
+ (BOOL) findBrowserInView:(NSView *)view {
// when we find the browser, set it’s path, and we’re done:
if ([view isKindOfClass:[NSBrowser class]]) {
// The LibraryFolder is a user preference, with a sane default:
[(NSBrowser *)view setPath:[[NSUserDefaults standardUserDefaults] objectForKey:@”LibraryFolder”]];
return YES;
} else {
// we’ll do a traversal of its subviews, if any:
NSArray *views = [view subviews];
int i = [views count];
while (i-- > 0) {
// the beauty of recursion: less code, less filling:
if ([self findBrowserInView:[views objectAtIndex:i])
return YES;
}
}
return NO; // we didn’t find the browser in this subview
}
So now, when the Sheet Savepanel is run, you can click the Resources button to instantly be transported to your Create Library folder.
Making Multiple-Resolution Icons
As mentioned above, the new Finder can display your application and document icons at several resolutions depending on the view and User preference. By default, if your icon just has one size, that size will get stretched or shrunk to the display size. This can produce nasty jaggies and squished, unrecognizable bits. At the time of this writing, there are only command line tools to produce icons in the “.icns” format, but it’s not too hard. For developers coming from Mac OS X Server, here’s how you make one:
1. Create a tiff of your icon at each desired resolution. Good ones to use are 16 by 16, 32 by 32, 48 by 48 and 128 by 128. You can use applications like Create or TIFFany to make these. For this example, we’ll assume a naming convention of app16.tiff, app32.tiff, etc.
2. Combine the tiffs into one multi-resolution tiff:
/usr/bin/tiffutil -cat app16.tiff app32.tiff app48.tiff app128.tiff -out app.tiff
Or if you just can’t stand the command line, run, don’t walk, to www.stepwise.com/Softrak/ and search for Malcolm Crawford’s “AppIcon” - a GUI frontend to tiffutil - cat.
3. Under DP3, use the provided utility “tiff2icns” to make the final icon:
/usr/bin/tiff2icns app.tiff
You’ll see the newly created “app.icns” - add this to the Resources suitcase of your project in Project Builder.
Where to go for more
The developer distribution of Mac OS X is loaded with sample applications and examples in both ObjectiveC and in Java (/System/Developer/Examples/AppKit). Documentation is in /System/Documentation/Developer. My advice to newcomers is to take one of these applications and begin adding new features to them. This lets you get your feet wet, without having to start from scratch. There are many articles about Cocoa programming available at www.Stepwise.com and I’ve written a number of useful articles and objects at www.stone.com/dev/. For example, “sWord” - the simple word processor, is a step by step introduction to Cocoa programming. You’ll build a word processor capable of handling kerning, justification, sub and superscripting, full Unicode support, spell checking, multiple font and paragraph styles, drag and drop of embedded graphics and colors, rulers with adjustable tab stops, reading and writing of conforming RTFD files, all in less than 13 lines of code! You cannot do this in any other development environment on the planet.
With Cocoa you can quickly create full featured applications, with many reusable components. Your code will be in a readable English-like form, and if you follow the design pattern of Model-View-Controller, you’ll have a basic architecture which will support many stories of future feature growth. Goodbye spaghetti, hello maintainability!
I’ve just barely scratched the surface of what’s new and cool in Mac OS X, and over the months to come, look for tips, techniques and trouble-shooting in my column, “Stone’s Throw”.
Andrew Stone <andrew@stone.com> is the chief executive haquer at Stone Design Corp <http://www.stone.com/> and divides his time between raising children and llamas and writing applications for Mac OS X.
|
|